

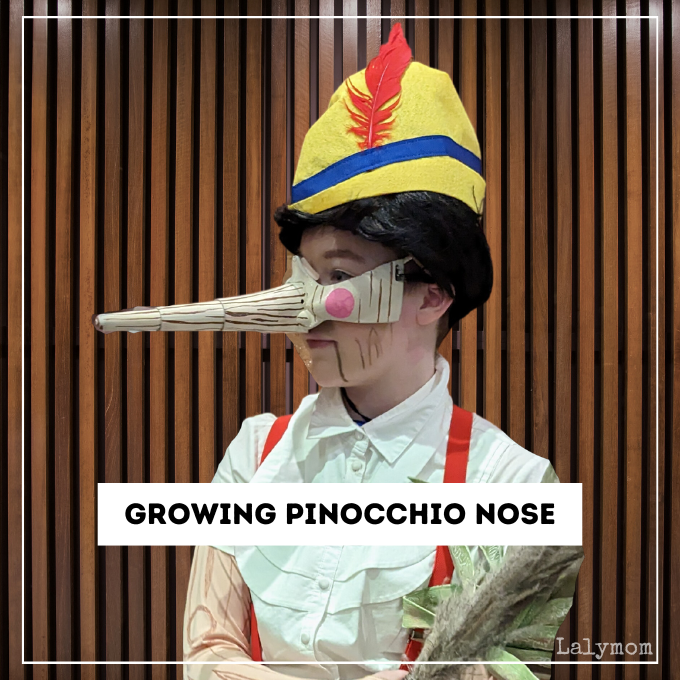
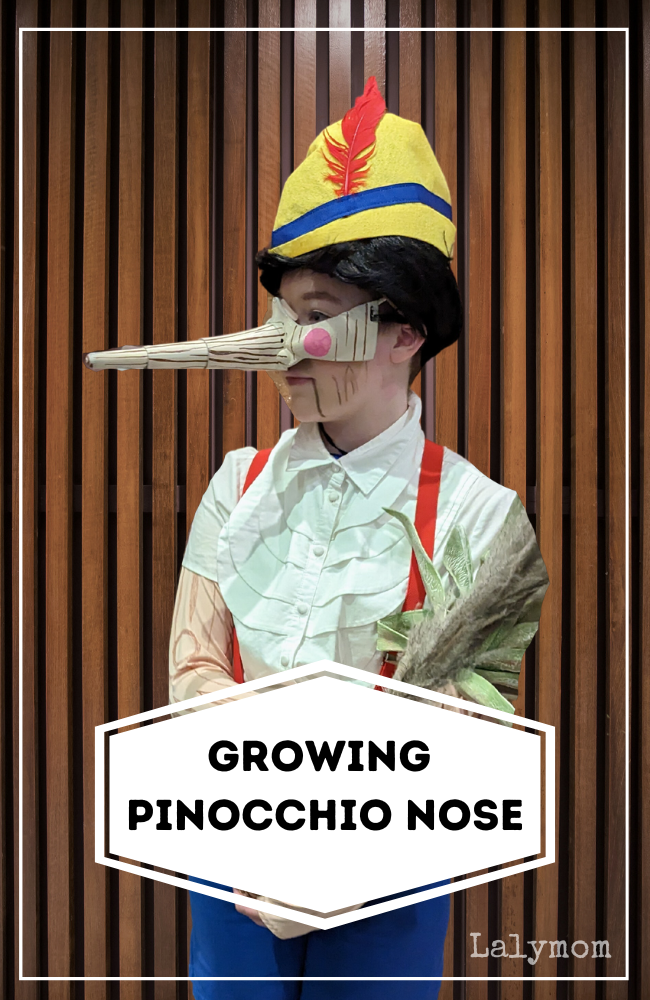
Today we are sharing a fun musical theatre project- a DIY Growing Pinocchio Nose- made for our Middle School production of Shrek the Musical. This DIY theatre prop would also work for Disney's My Son Pinocchio as well as Book Character Costumes, Halloween or Fairy Tale Cosplay. We are also including the rest of the costume items, plus I have a separate tutorial to make wood grain arms and legs, in case you are looking to complete the look. Affiliate partner shopping links are included in this post.
This was my 7th grader's second year doing a school musical, and I volunteered to help the awesome costume committee at the school.
Shrek the Musical has a large cast, and our school adds a whole chorus and ensemble so that no one is cut from the show. Everyone is welcome! It is quite a spectacle but it also is quite a lot of costumes.
When we started working on costumes we went with these basics for Pinocchio:
- Pinocchio Costume Accessory Pack (Including a rubber nose)
- Wig
- Long Blue Shorts
- Button Down White Shirt (We found ours in the school's existing costume closet.)
- Blue High Tops (Ours were donated by a cast member.)
Since we had a LOT of other costumes to create, any additional elements for Pinocchio were low priority.
Luckily time did allow for us to get to some fun, extra special parts of the costume!
These DIY Wood Grain Pinocchio Arms and Legs were a cool, creative project that really added a finishing touch to our Wooden Boy. That link has my quick tutorial and materials list to make your own.
Extendable Pinocchio Nose That Grows Options
For Pinocchio's nose, we already had a rubber Pinocchio Nose from the Pinocchio accessories kit. If it came down to it, we would just use that one. The actors said it was very uncomfortable though, and it obviously doesn't grow, for those scenes in Shrek the Musical when Pinocchio tells a lie.
While researching the growing nose, I found several different photos, articles and ideas as well as some pre-made options.
For DIY inspiration, definitely check out these websites:
- STEM Class Students Invent Ways to Make a Growing Nose
- Instructables Entry on Making a Pinocchio Mask with Growing Nose
- Engineering Student 3D Prints a Pinocchio Nose
- Theatre Projects' Pinocchio Nose
You can research rentals in your area, we didn't find many viable options near us due to cost.
If you are looking for a growing Pinocchio Nose for sale, this stage costume vendor sells awesome looking Pinocchio Noses in Mini or Regular.
The reviews for his products are awesome. They also have other Shrek costume pieces. There were people commenting on the vendor's Youtube video who complain about the price, but to be honest that is a great price, for a few reasons:
- Your other options are to make to rent one. If you can even find a Pinocchio Nose for Rent, it often costs more than the one for sale, and you only have it for a short time.
- Making one required a lot of materials and knowledge that I didn't already have. So purchasing one from someone who has the know-how, and not spending all your time wondering if yours will even work, might be worth MORE than the cost of that one. In the end the one I made did work, but it is a bit MacGyvered. I needed to be on hand to make sure it was set up correctly. Whereas, the costume maker does this for a living and the reviews reflect that it works well.
- Once you own one, you can share or potentially rent for a small fee to other theatre organizations if they are looking for one.
- You can see more of the actor's face with the one for sale than with the one I made.
BUT. I didn't know any of that before making our own. This article is to share how we made ours, so below is the tutorial on how we did it.
How to Make a DIY Growing Pinocchio Nose Prop
After reading the article about the engineering student who made her own Growing Pinocchio Nose, and watching the costume maker's video, I had a good starting point.
We started with a 3D printed mask, painted it, and then affixed a bike brake cable to the inside of the mask to make the nose grow and shrink.
3D Printing a Pinocchio Nose and Mask
Our public library has a 3D printer from which library patrons can order prints (you do pay for the material used). I found a link on our library website for a 3D Print Design Database called Thingiverse.
On there I typed in Pinocchio Nose and found these two unrelated files, both of which are available for use and editing under the creative commons license:
- Modular Pinocchio Nose submitted by GiacomoLoru
- Pinocchio Mask (comments state they attached a toy light saber for the nose portion) submitted by fiveliter8
I have never 3D printed before so I wrote to the library staff member in charge of 3D printing wondering if there might be an easy way to merge the two files.
Guys. Once in a while you just find the exact person that you needed to find. That's what happened here. I happened to reach an amazing Library Staff Member (THANKS NICHOLAS!) who happens to make 3D printed pieces for Cosplay in his spare time. Can you believe it?!
He not only merged the files, he scaled it to fit our tween aged actors, then printed a “slice” to check the sizing, AND gave me all sorts of helpful tips and recommendations on working with 3D Printed materials. This truly would never have happened without his help.
If you are considering making a mask like this and would like to use the STL files that our librarian used, I have attached them below.
PLEASE NOTE: *I* am not at all familiar with 3D printing, and cannot assist you with any technical issues. At all. Even basic ones. Please do not leave comments or emails asking about 3D printing.
Pinocchio Nose STL Files Folder
You may have to scale it to fit the person who will be wearing it. Be sure to print a slice across the cheeks to see if it fits.
Here is what the brown 3D Printed pieces looked like before priming and painting.
The following is not an exact set of instructions for you to follow. I am going to tell you the steps I took to make this one, then after that I will share tips and things I might have done differently.
In other words…. this is how *I* did it. It may not be how you do it. Take what you can from this tutorial, and make your own version.
Ok. So.
Pinocchio Growing Nose Materials List

- 3D Printer and Print Material (ours were provided by our Library)
- Primer (specifically designed for plastics)
- Paint
- Paint Markers
- Elastic (I had previously ordered this 2 pack of flat elastic)
- Bike Cable (I bought a 2 pack in case of boneheaded mistakes)
- Cable Lubricant
- Glue (This type recommended by the 3D Printing Staff member at the library)
- Cable cutters
- Standard large paper clip
- 2 sets of Cushioning for mask (Recommended by the 3D Printing Staff Member at the Library)
- Low temp hot glue gun
- Hot glue sticks
- Cardboard box or plastic table cloth to protect your work surface while spraying
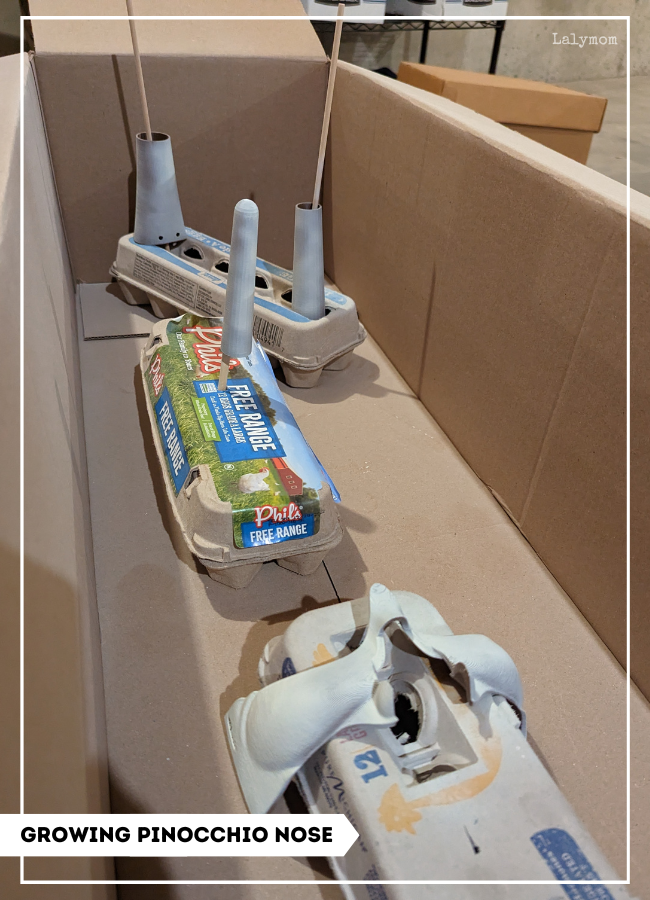
- Dowels and egg cartons or other method to stand up the pieces while spraying and drying
How to Make a Growing Pinocchio Nose
(Okay, How *I* Made a Growing Pinocchio Nose)
Be sure to use the primer, paints and glue in a WELL ventilated place. You may still want a mask. Allow for several days, due to the dry times for glue, primer and paint. We actually let ours air out outside for a few hours.
Once we received the 3D printed pieces from the librarian, I used a beige colored primer to coat all the pieces.
Once fully dry, I added a coat of tan spray paint.
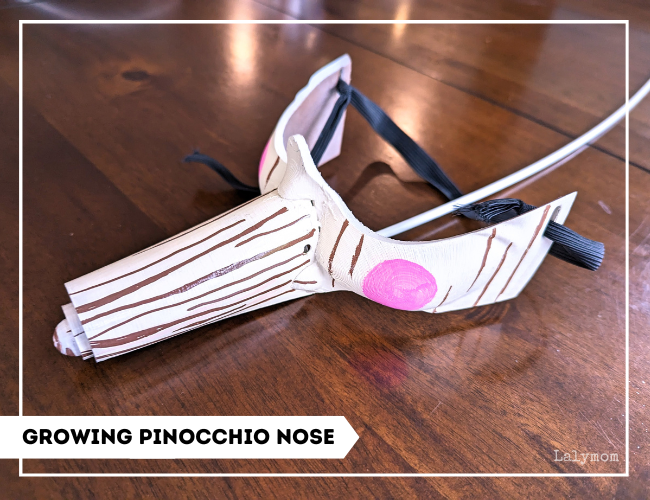
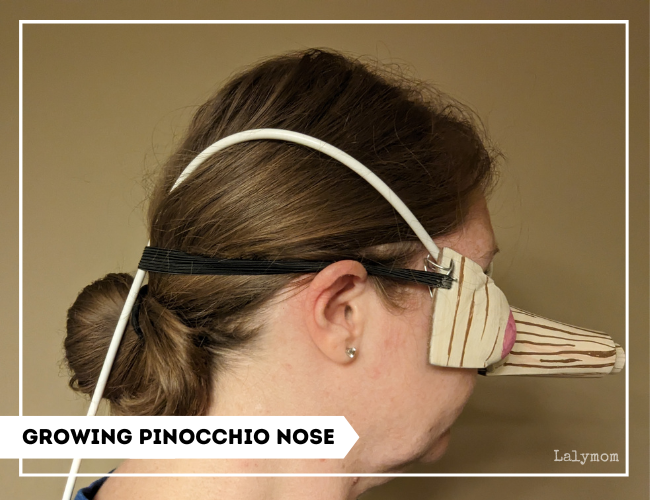
Once that dried, I added the brown wood grain with acrylic paint markers, and pink cheek circles using pink acrylic paint and round tip sponge brushes.
We let all the pieces dry fully, standing them all apart, for a full day before sliding them into each other and trying them out. They seemed to work well! They do make a noise when sliding in and out, but it lends a noise to the “growing” action.
Next I glued the largest nose piece to the mask portion, and again allow to dry. I went over the outside and inside of the seem with an additional layer of glue. Our trusted advisor, Nicholas from the Library, recommended this type of glue for this seem. It worked very well but as he warned us, we were careful not to hold or pull on the nose once it was glued. Instead we always held the cheek portion to pull it on and off the actor's face.
After that fully dried, I added black flat elastic to the mask holes near the ears.
Next we grabbed the bike cable and cable housing. Using cable cutters, we snipped off one end of the silver cable, all the way at the end. Then you can slide the cable into the white housing. (NOTE: We tried to cut the cable using our pliers and it just mashed the cable. We couldn't find true cable cutters so had to go with bolt cutters. The cut end of the cable will be very sharp, and tends to whip around, so be very careful while working with it.)
We added a couple drops of cable lubricant to help ensure it moves smoothly. I waited to trim the housing and cable until I could fit it on my actor and be sure it was going to be long enough.
The next step was done with two people. We were using all of our hands so I don't have a photo of the process.
With all the 3D print pieces still apart, one person held just the smallest portion of the nose (the tip of the nose) with the opening facing up. The other person carefully squirted hot glue into the very tip of the nose, pooling it in there, and being very careful not to get glue closer to the top of the inside of the nose. (We didn't want the cable to catch on any dried glue towards the top.) We had a chopstick on hand to push the glue down in case it touched the sides.. Once it seemed like there was around half inch to 3/4 inch of glue into the tip of the nose, but it was still warm, we stuck the capped tip of the silver bike cable (NOT THE WHITE HOUSING! Just the silver cable, the end that we did not cut off.) as far into the glue at the tip of the nose as we could, holding it in the center of the nose piece so it didn't dry off to one side.
We let it dry for a good long time before moving on.
When we were ready for the next step we assembled all the 3D printed pieces together, nesting the nose pieces into each other.
The trickiest part of the whole project was affixing the bike cable to the mask portion. The cable is too rigid and strong to really lay nicely against the inside cheek section of the mask. And I couldn't bend it too much because the cable needed to slide smoothly through the housing. None of the adhesives would hold it.
This was where we used our MacGyver skills, and it is the part that need attention every time you put the mask on.
I took a large paper clip and slid it down the length of the cable, then slid one end into the hole where the elastic attaches to the mask. I used needle nose pliers to make a kind of cage for the cable. I then just bent the rest of the paper clip onto the mask to hold itself in place.
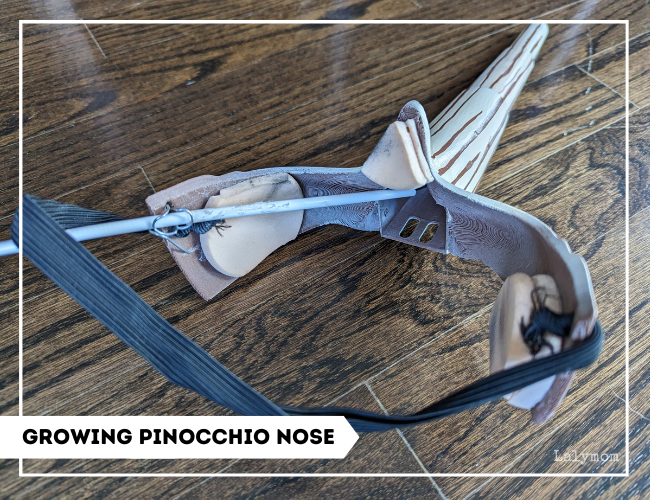
If you can figure out a better way to affix it, that is one area for improvement. It did fine for our show. It held the housing but it could still slide some. You had to make sure to slide the housing down the cable enough to leave slack for the nose to slide out.
The length of the cable went over one ear, up onto the actor's head, under the mask elastic at the back of the head, then down the center of her back.
Before every show, I secured the white cable housing towards the bottom of the suspenders with masking tape. I made a small sheath of red fabric with velcro dots to velcro around Pinocchios's red suspenders to hide the tape and give it extra support to stay in place.
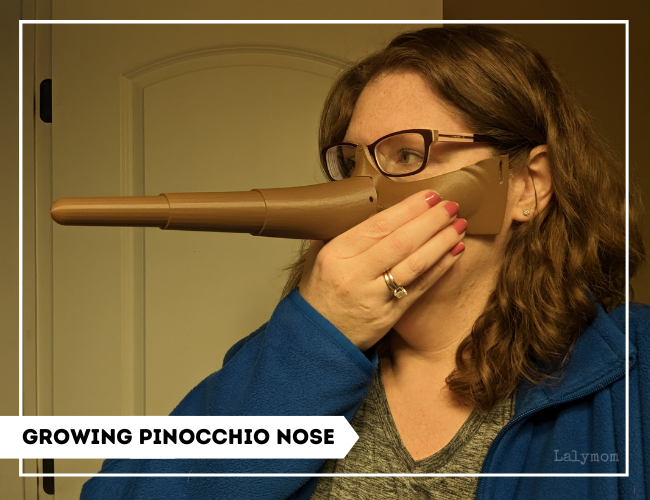
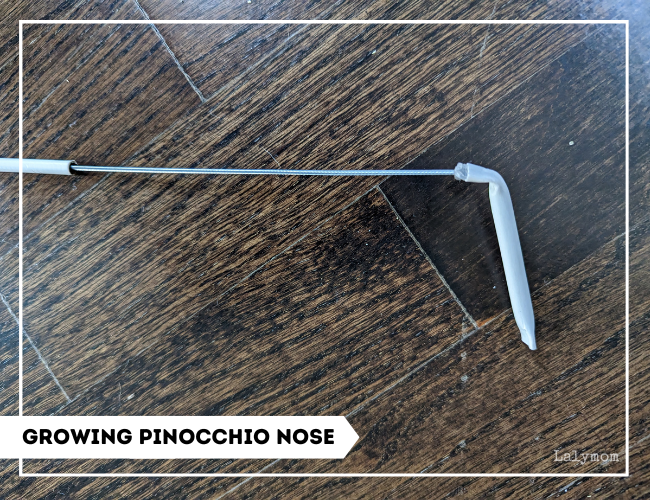
At the very end of the cable, we needed a “handle” for the actor to use to slide it in and out, and to cover the sharp end of the cable.
We put the mask onto our actor and got it in place. Next I had to trim the white cable housing to be the right length. I extended the cable as far as it needed to go to push the nose fully out. Then we trimmed the cable housing so that about 3 inches of the cable was left sticking out the bottom. These three inches would be the handle.
MacGyver skills to the rescue again. I was originally thinking of using these cool moldable beads that I had on hand.
But then I remembered I had set aside some of those little tubes that companies use when you buy new shoes, and they stick the tubes in to keep the shoes from becoming smooshed. So I cut a length of one of those, and bent it with the last couple inches of the cable at the end, so there was just the right amount of slack coming out the other end to allow the nose to fully extend.
The last thing I did was to add padding or cushioning to the inside of the mask. Nicholas from the library recommended makeup sponges for this. They are soft and are meant to touch your skin, they are easily trimmed to the size and shape you need. A great solution.
The first thing you might notice when putting on the mask is that the cable pressed against your cheek. This is not only uncomfortable but it shifts the mask off-center.
We added a double stack of cushion inside the opposite cheek. I added a layer at the bridge of the nose, and one to go between the actor's cheek and the cable. This last piece of cushioning was glued to the bottom inside of the cheek but had to slide it into place on the actors cheek every time we put the mask on.
You can see the cushioning in a photo above. The one by the cable is the one that needed to be manually placed against the actor's cheek.
Phew. So. That's that.
Here is a tiny clip of the nose extending. It does retract but once in a while the middle nose piece sticks a tiny bit. You just tap it to dislodge and it is fine. Not something we needed to do on stage, since it only grew on stage.
Putting On the Growing Pinocchio Nose
To get into costume, this was the process:
- The actor put on the full Pinocchio costume, including the bow tie and suspenders.
- I put on the mask, with the cable going a couple inches over one ear, then under the mask elastic and down the back, outside of the shirt. We made sure the cheek cushion was in place.
- I taped the cable in place with masking tape towards the bottom of the suspenders, then wrapped the red fabric sheath around it to hide the tape. (I think every time I did this I used more and more tape. I ripped or cut the tape off each time when removing the mask at the end.)
- Next we added the wig cap over the actors hair. The wig cap also went over the cable on the actor's head. We pinned the cable through the wig cap to really hold the cable in place.
- Next the actor put on the wig, and the wig was pinned in place.
- Finally we added the hat.
With every thing in place, Pinocchio could now reach one hand behind and push in the cable handle near their waist, to extend the nose.
How Did Our Nose Work?
The nose worked throughout a rigorous schedule of 8 shows (Since we had two casts, we ran a total of 4 dress rehearsals and 4 shows!) but I will say, it wasn't perfect.
Placing the cable just right was important. If I wasn't the one to put the mask onto the actor myself, the cable wasn't placed right and there wasn't enough slack to push the nose out fully. We had over 100 kids between the two casts, so this was a lot of attention to give to just one person.
One other time the hot glue affixing the cable inside the tip of the nose finally failed, and the nested nose pieces were sliding in and out of the the mask. They didn't fall out, due to the nesting design, but as Pinocchio did choreography, it slid in and out several times. We re-glued it for the next performance and it worked fine again.
Tips And Recommendations In Hindsight
In no particular order, here are things that I learned along the way.
- Stress and Fulfillment: It was cool and fun to make this, but also, at times frustrating and hard. I enjoyed brainstorming the different design aspects. But it was stressful to think that if my design failed, it could stress out the actors or cause a distraction during the show. In the end I found it very fulfilling, and was so thrilled that it worked. If this doesn't seem like your cup of tea, here again is that Costume & Prop designer with the Growing Pinocchio Nose for Sale. 🙂
- Microphones: Remember to check if your microphones need to be on one ear or the other. Ours have thin wires that go over both ears, but the actual microphone was on the right. So we opted to put the cable on the left. It didn't interfere at all with the style of microphone that we use but yours could be different.
- Sanding: Nicholas did suggest that I sand the 3D pieces before painting. He said to go very light and easy, taking breaks, when doing so because the heat and friction could warp the plastic material. I had a different idea at first, because ours was 3D printed using brown 3D print material. I was thinking that if I used beige primer, and sanded just the outer layer of primer off that the dark brown 3D printing material would show through and look quite a bit like wood grain. That didn't work in the end, so I painted over the primer with spray paint and added the brown lines with paint markers. Yours might be smoother and slide even better if you sand it but, I didn't so I don't know.
- The fumes of the wet glue and paint are pretty overwhelming so be sure to allow time to sit it outside to release fumes before having anyone put it on their face.
- Feel free to improve on this design any way you see fit. If you actually do it, feel free to share your own tips and improvements in the comments below to help the next crafty costume committee member on their Extendable Pinocchio Nose project.
Good Luck with your Pinocchio Costume and your Growing Pinocchio Nose!
The post DIY Growing Pinocchio Nose & Costume appeared first on LalyMom.
Growing-Pinocchio-Nose-Demo.mp4 (4.9MB)